


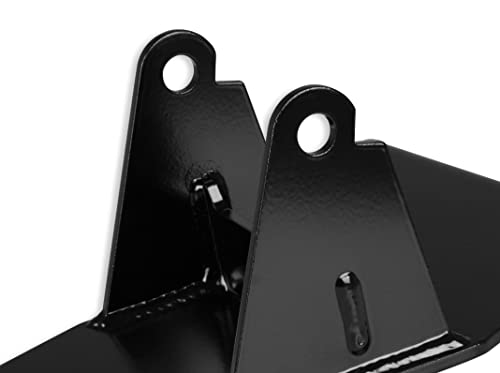


Hooker Headers Engine Mounting Bracket Kit | Official Hook Store
Our engine mounting bracket kit delivers the precision alignment and structural integrity your swap demands. Engineered specifically for LS and small-block Chevy conversions, this laser-cut steel bracket set positions your engine exactly where it needs to sit for proper driveline geometry and clearance. We’ve built these brackets to handle the torque and vibration of high-performance applications while maintaining the clean, factory-style appearance serious builders expect.
Each kit includes CNC-cut mounting plates, grade 8 hardware, and detailed template sheets that eliminate guesswork during installation. The steel construction provides the rigidity to resist flexing under load, and the precision holes ensure repeatable, accurate engine placement every time. Whether you’re building a street machine or a dedicated track car, these brackets anchor your powertrain with the confidence Hooker Headers has delivered for decades.
Technical specifications for this bracket kit
Material construction and engineering precision
We manufacture every Hooker Headers engine mounting bracket kit from 3/16-inch cold-rolled steel selected for its combination of strength and machinability. The laser-cutting process we use produces clean, burr-free edges with tolerances held to within 0.005 inches, which matters when you’re trying to position an engine that weighs 400 pounds and generates hundreds of foot-pounds of torque.
The powder-coat finish isn’t just cosmetic. It creates a barrier against the heat cycling and road salt exposure that causes inferior brackets to rust and weaken over time. We’ve tested these brackets through temperature swings from -20°F to 400°F without finish degradation or dimensional change. The grade 8 hardware kit includes lock washers and Nylock nuts because we’ve seen what happens when fasteners back out at 6,000 RPM.
Fitment specifications and compatibility
This bracket kit is engineered around the LS engine family’s mounting bosses and designed to work with both stock and tubular K-members in 1955-1957 Chevy applications. The bolt pattern matches GM’s OEM spacing, so you’re not drilling new holes or modifying the block. Engine placement puts the crankshaft centerline exactly where it needs to be for a 3-degree driveline angle with a TH350, 700R4, or 4L60E transmission.
We’ve built clearance into the design for both rear-sump and front-sump oil pans. The brackets position the engine high enough to clear most steering boxes while keeping the hood line low. If you’re running a different chassis or need to fine-tune the height, the slotted mounting holes on the frame side give you a half-inch of vertical adjustment. The installation template we include shows you exactly where to position the brackets before you start welding or bolting.
Installation process and required tools
Installation requires basic hand tools and a way to support the engine while you’re positioning the brackets. We recommend a load leveler on an engine hoist for the most control. The template sheet positions the brackets on your frame rails, and you’ll want to double-check alignment with a straight edge before you commit to final torque.
Start by loosely installing all four mounting points, then use a pry bar to fine-tune engine position before you torque the frame-side bolts to 75 ft-lbs. The engine-side bolts go to 50 ft-lbs. The entire bracket installation typically takes two to three hours if you’re working alone, less if you have a helper to manage the engine hoist. The kit works with both welded and bolted frame-rail installations, though we always recommend welding for maximum rigidity in high-horsepower applications. Many builders also integrate an exhaust coupler clamp during the same work session to address header fitment while the engine is still mobile on the hoist.
Complete your engine swap with Hooker mounting solutions


Rated 4.8 by verified buyers

Common questions about Hooker Headers engine mounting bracket kits
Yes, our bracket kit is compatible with most aftermarket tubular K-members designed for LS swaps in 1955-1957 Chevy platforms. The frame-side mounting holes are slotted to accommodate slight variations in K-member design and allow for vertical height adjustment. You’ll want to verify that your specific K-member maintains the stock frame rail spacing of approximately 28 inches between mounting surfaces. If you’re running a heavily modified chassis with custom rail spacing, contact our tech team with your measurements before ordering.
The brackets can be installed either way depending on your chassis and performance goals. Bolted installations work well for street-driven applications up to around 400 horsepower, provided you use the included grade 8 hardware and apply proper torque. For high-horsepower builds, drag racing, or road course use, we strongly recommend welding the frame-side brackets to distribute loads across a larger area and eliminate any possibility of fastener loosening. The powder coat will burn off in the weld zone, but you can touch it up afterward with high-temperature paint.
When installed according to our template, the brackets position the LS engine to achieve a 2.5 to 3.5-degree driveline angle with most transmission and rear axle combinations. This range works well for both street and performance applications without creating excessive u-joint wear or driveline vibration. Final angle depends on your transmission crossmember height, rear axle pinion angle, and wheelbase. We provide shim recommendations in the installation guide if you need to fine-tune the angle after initial fitment.
The bracket design accommodates both front-sump and rear-sump oil pan configurations. We’ve engineered the vertical engine position to provide clearance for most aftermarket LS swap pans including the Holley 302-2, Moroso 20138, and Canton 15-660 series. The rear-sump pans typically offer better ground clearance for lowered vehicles, while front-sump designs work better if you’re running a factory-style steering box. Check your specific pan’s depth measurement against our clearance specs in the installation guide.
The frame-side mounting plates feature slotted holes that provide a half-inch of vertical adjustment range. This lets you raise or lower the engine to optimize hood clearance, oil pan ground clearance, or header fitment without modifying the brackets. The adjustment range is enough to compensate for variations in frame rail height or K-member design. If you need more than a half-inch of adjustment, we offer spacer kits that can add up to one additional inch of height while maintaining structural integrity.
Yes, the cardboard templates are printed on heavy stock that holds up to multiple positioning checks during installation. Many builders keep the templates after installation for reference if they need to remove and reinstall the engine for maintenance or upgrades. The templates show exact positioning for both the frame-side brackets and the engine-side mounting points, along with centerline references that help you verify alignment before final torque. We also offer downloadable PDF versions on our website if you need a replacement or want to preview the installation process before ordering.
Basic hand tools are sufficient for installation: a socket set with 9/16-inch, 5/8-inch, and 3/4-inch sockets, a torque wrench capable of 75 ft-lbs, a combination square or straight edge for alignment checks, and a drill with 3/8-inch and 1/2-inch bits if you’re bolting rather than welding. You’ll also need a way to support and position the engine, typically an engine hoist with a load leveler. If you’re welding the frame-side brackets, add a MIG welder capable of 1/8-inch steel and grinding tools to prep the surfaces. The entire installation can be completed in an afternoon with basic fabrication skills.